

Monday, October 22, 2007
Thursday, October 18, 2007

Wednesday, October 17, 2007
Creating Animated Dialogue
Below are the mouth movents that made up the animation:
"AAH"

"B" "M" "P"

"EEE"

"F" "V"

"L" "N"

"OOO" "R" "Q"

Mouth at Rest

ONCE YOU HAVE YOUR BASIC MOUTH SHAPES (and you may choose a slightly different set, though I consider these to be essentials), you would make copies of the mouth pix and downsize the copies.
Then create a new file (with transparency) that's big enough for your widest mouth still. Copy and paste each of the mouths onto into this new file so that each mouth has its own layer (see below)

In this multi-layered file, make sure that the mouths overlap as closely as possible. Basically, you want the mouth movements to look like they come from the same source (or point on the face) so that when you import them into Final Cut or After Effects, you don't have to worry about lining them up over and over (which would be a big headache). They'll just be anchored to the same invisable point.
Tuesday, October 16, 2007
Class Rotoscope Project
Each student in the FST398 007: Modes of Animation class was assigned 10 seconds of the ball tossing activity to rotoscope. First, live action video was taken of students and then the students had to export the video as single frames to trace over in Photoshop. Enjoy!

Thursday, August 30, 2007
Converting .gif animation to a QuickTime movie
Remember those Muybridge pictures we practiced on for making .gif animations, last week. Here's one converted from a .gif to a QuickTime movie. The bonus here, is that we can add sound (name that tune!)

Wednesday, August 29, 2007
Still looking for ideas on who to present for your animation presentation?
I have provided a list of animators, if you're still stumped on who to present for your class presentation. This is by no means a comprehensive list or a list of the best-animators-in-the-world-in-descending-order or anything like that but a simply a starting point. No doubt, there are hundreds of other equally talented animators we could add to the list but these folks might be easier to find at the video store or in Randall Library than most.
1) Jan Svankmajer
2) The Brother’s Quay
3) Norman McLaren
4) Bob Sabiston (“Waking Life,” “A Scanner Darkley”)
5) Windsor McCay
6) Oskar Fischinger
7) Fleischer brothers, Max and Dave
8) Nick Park / Aardman Animation
9) Bill Plympton
10) Alexander Alexeieff
11) Joanna Quinn
12) Don Hertzfeldt
13) Ralph Bakshi
14) Caroline Leaf
Monday, April 30, 2007
FST 398 007: A Manifesto of Sorts

Is it possible that the above pictured lego element will be unrecognizable by future generations of children in favor of the below pictured lego package and many other pre-packaged lego sets like it.

Let's cut to the chase: what do legos have to do with animation (unless you're talking about the lego-animated White Stripes video or animating with legos in general)?
In this case, the lego block is simply a metaphor. It seems graphics software is developing along the lines of the packaged 4-wheeler lego set.
These software programs are getting more and more complex with more bells and whistles. Now, not only can you edit your film non-linearly but you can add explosions, turn your main actor into glass or summon a digital plague of locusts with a couple of mouse clicks (ok, I’m exaggerating here, a little - maybe). If you have the most up-to-date software, it is possible to do almost anything with your film.
But in this class, we’ll focus on the basic lego block and our challenge will be this.
What can we do with those simple lego blocks?
They haven’t been pre-packaged in such a way that they can only build 4-wheelers or space ships so the possibilities offered by these simple blocks are endless.
Likewise, I want you to think of the tools we’ll be working with as offering endless possibilities. How do your animations say
– YOU –
and not just advertise some cool-looking canned effects that will impress your friends but be more the product of the software creator than the product of your imagination.
Cheers and happy lego building
Monday, April 23, 2007
Sample Assignment
In this class, we will look at producing animations which live in a variety of environments from digital video to the web.
One example of animation we will work with is .gif animation for the web. You have, no doubt, run into this kind of animation before, when surfing the internet. Below is one such example. (If image is not moving click on image)
How would we go about creating our own .gif animation, in class?
Let's start with a series of pictures. These were taken with a 4-lens Lomo camera that uses 35mm picture film but you could get a similar result if you were to use pictures taken in a photo booth at the mall. Or you could just set up a digital camera and take a series of pictures.

Next, we desaturate the photo in Photoshop. In class, we'll learn about desaturation and several different ways to manipulate images in Photoshop.
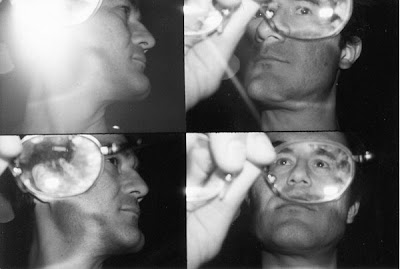
And now comes the fun part. We'll take this series of four pictures and animate them. We'll save the file under the extension .gif, which is similar to .jpeg or .psd in that all are image files. However, a web browser can recognize any animation components within a .gif file. (If image is not moving, click on image)
(*If you're not seeing a rapid play of the 4-picture sequence, the .gif file is loading or you'll need to upclick on your mouse)
And that's not all. Since we desaturated the image, we'll be able to add our own color. (If image is not moving, click on image)Take your pick:
OR:
The possibilities are endless. But you get the idea. This technique can be used to create moving logos and lots of other stuff.
One example of animation we will work with is .gif animation for the web. You have, no doubt, run into this kind of animation before, when surfing the internet. Below is one such example. (If image is not moving click on image)

How would we go about creating our own .gif animation, in class?
Let's start with a series of pictures. These were taken with a 4-lens Lomo camera that uses 35mm picture film but you could get a similar result if you were to use pictures taken in a photo booth at the mall. Or you could just set up a digital camera and take a series of pictures.

Next, we desaturate the photo in Photoshop. In class, we'll learn about desaturation and several different ways to manipulate images in Photoshop.

And now comes the fun part. We'll take this series of four pictures and animate them. We'll save the file under the extension .gif, which is similar to .jpeg or .psd in that all are image files. However, a web browser can recognize any animation components within a .gif file. (If image is not moving, click on image)

(*If you're not seeing a rapid play of the 4-picture sequence, the .gif file is loading or you'll need to upclick on your mouse)
And that's not all. Since we desaturated the image, we'll be able to add our own color. (If image is not moving, click on image)Take your pick:

OR:

The possibilities are endless. But you get the idea. This technique can be used to create moving logos and lots of other stuff.
Subscribe to:
Posts (Atom)